Slide Containers
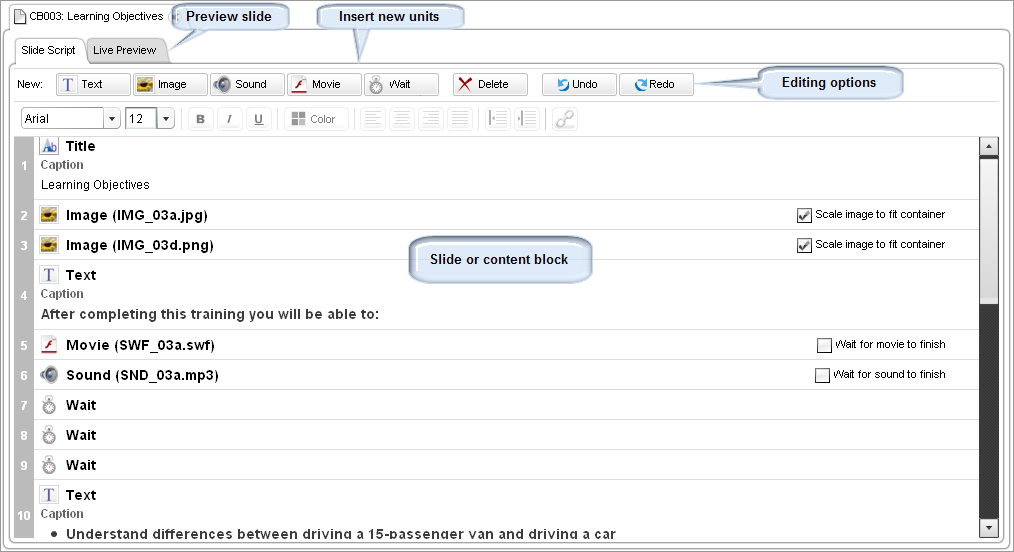
You can define the content of each slide on the Slide Script tab. On this type, you can add each type of information or file you want to include separately (text, images, sounds, or multimedia files). Some important notes about adding content to slides are listed below.
- First, you create a container of the
appropriate type (image, sound, movie). The container holds the asset you want
to display. After creating it, you fill it with the appropriate asset.
Note: Be sure to always add an asset to a container. Empty containers generate errors when trainees view the presentation.
- All the containers take place in the order in which they display on the slide, so make sure they are listed in the correct order.
- If you want to extend the length of time an image file displays or a sound file plays, you must add a Wait container right after that image or sound container.
When you add containers to a slide, the system places them below where your cursor is. You can add containers to a slide in two ways:
- Click the container after which you want to add a new file and click the button for the type of file you want to add.
- Right-click on the container below which you want to add a new file and select the appropriate option. The options are Insert text, Insert image, Insert sounds, and Insert movie.
| Container | Description |
|---|---|
| Text Containers |
Text in a slide respects the format of the template you have selected. So, if you select a template that allows text only on the left side of the canvas, that's where any text you add to the slide appears. Even if you center the text when you add it, the text appears only in the left side of the canvas (centered, according to your formatting), not across the whole canvas. |
| Image Containers |
Notes:
Image sections in templates have a fixed size. Refer to the following topics to learn more about the sizes of images you can add to certain slides. In some cases, you need to resize your image files to the size of the image container you want to use before uploading images into the CCS.
Image containers in content slides include the following configuration option: Scale image to fit container check box. Select this check box if the system should automatically resize the image when you upload in into a container. The system resizes the image only if it is larger than the expected image size based on the slide template. |
| Sound Containers |
You can use .mp3 files (recommended) for your sound files: 22KHz, 16 bit, 24 kbps, monophonic. We do not recommend using .wav files due to their large size. Sound containers include the following configuration option: Wait for sound to finish check box. Select this check box if the system should wait for the sounds to finish before displaying the next container in the slide. |
| Movie Containers |
You can upload the following multimedia file formats into the CCS: .3g2, .3gp, .avi, .flv, .mp4, .mpeg, .mov, .ogg, and .wmv. During the upload process, the CCS automatically converts these file formats to .flv files. This change ensures the files work correctly in the PureSafety. Movie containers include the following configuration option: Wait for movie to finish check box. Select this check box if the system should wait for the movie to finish before displaying the next container in the slide. |
|
Wait Containers |
Waits are important because they set the pace of the presentation. You must add a wait if you want your test or image to stay on the screen for a specific period of time. Wait containers include the following configuration options:
|