Create Employees
Employee records must have a website account to access the system. The Employee Information screen allows you to store all the necessary information about your trainees.
-
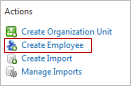
In the
Actions
menu, click
Create
Employee.
-
Complete the
Identification section.
This section contains data that helps you identify an employee and distinguish him from others.
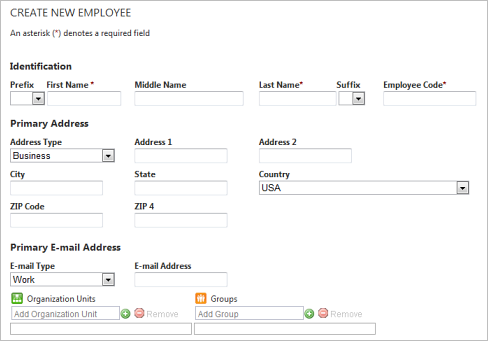
Fields Details Prefix, First Name, Middle Name, Last Name, Suffix
First Name and Last Name are required.
Employee Code
Required unless you provide the last 4 digits of the employee's Social Security Number and his home address. Must be unique.
Primary Address
You can type additional addresses after you create the employee by editing the employee record.
Primary Email address
The email address listed in this section is important because it is the external address to which any notifications are sent. If you add multiple addresses, note that only the primary email address will receive notifications.
You can add additional email addresses after you create the employee by editing the employee record.
Organization Units
Use the Add button to select the employee's organization units.
Groups
Use the Add button to select the employee's groups.
-
Complete the
Website
Account section.
The employee will have access to PureSafety if you complete this section.
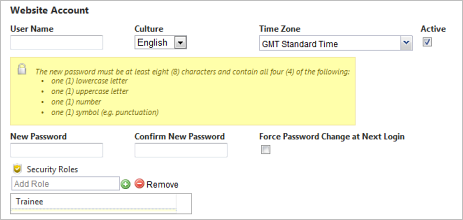
Fields Details User Name
The name used to login to PureSafety.
Culture
The language preference for the employee. Once a trainee is logged in, trainee messages and forms will display using the language selected.
Time Zone
The employee's time zone.
Active
When checked, indicates the employee is an active PureSafety user and opens the Security Roles area. The checkbox defaults to checked.
New Password and Confirm New Password
Fields must match in order to continue. Minimum password requirements are established by the system administrator.
Force Password Change at Next Login
When checked, users are forced to change their password when they login.
Security Roles
Use the Add button to select the employee's security roles. Security roles established as defaults are added automatically.
see the Define Default Security Roles for New Employees topic for more information.
You must add at least one security role to an employee.
-
Complete the
Advanced
Options section, as needed.
The Advanced Options section is collapsed when you enter the screen. Click the plus sign icon to expand the section. The fields in this section allow you to track additional employee data.Note: You cannot report on this information, but you can upload it through imports.
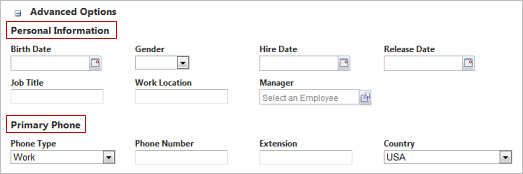
Fields Details Personal Information
You can add personal information after you create the employee by editing the employee record.
Primary Phone
You can add additional phone numbers after you create the employee by editing the employee record.