Schedule a Report
Schedule any report that has been added to the My Reports directory. You can also send external email messages containing reports to any person in your database with an email address in their account. This screen is also used to make changes to the schedule of a report.
-
On the report parameters edit screen,
click the
Schedule
check box to expand the
Schedule
and
Delivery
sections.
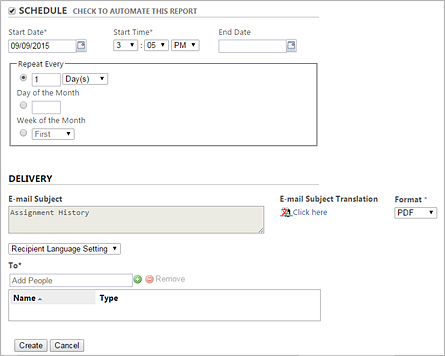
- Specify when the report should run in the Schedule
section. You can use the Repeat Every section to determine when and how
often you want the report to run. Options available to each Repeat Every
selection are displayed when the button is selected. Click the select all |
select none links to quickly check/uncheck the month or days of the week
check boxes.
-
Use the Delivery section to record information about who should receive these scheduled reports through email. Select the format of the report and select the recipients from the People list.Note: The Company name and the person who created the scheduled report is shown at the bottom of the email.
Click the hyperlink under the Email Subject Translation and then click a language option to add a customized subject line. Add text for each language your company supports. The email subject line defaults to the report title.
Note: Scheduled reports are not updated when a user changes his language preference. Users receive scheduled reports in the language is set in their user settings when the report is scheduled. If a user updates his language preference, he will continue to receive the schedule report in the previously set language.
- Specify when the report should run in the Schedule
section. You can use the Repeat Every section to determine when and how
often you want the report to run. Options available to each Repeat Every
selection are displayed when the button is selected. Click the select all |
select none links to quickly check/uncheck the month or days of the week
check boxes.
-
Click
Create or
Save to
update the report.
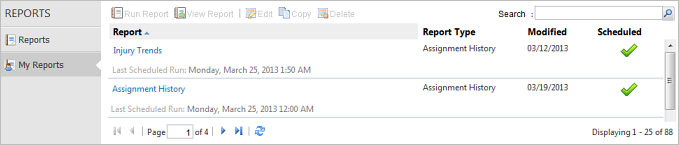
The My Reports screen appears. Scheduled reports are indicated with a green check in the Scheduled column.
Updating or Deleting Schedule Options
This same screen where you define the schedule and
delivery options is also used to make changes to the schedule or remove
scheduling.
- To make changes to the schedule criteria, edit the report and save your changes.
- To remove the schedule criteria, edit the report, uncheck the Schedule check box, and save your changes. Once you have saved your changes all schedule selections are cleared.
Note: Scheduled reports continue to run even after
the user account associated with the scheduled report has been deactivated.
These reports must be manually deactivated when an administrator account is
deactivated.